Server Management
Information & Applications related to Linux server management
Cockpit

Introduction
Cockpit is a free and opensource web-based graphical server management tool that allows administrators and Linux users to easily manage and configure their Linux servers/PCs from a browser.
Cockpit is easy to install and simple to use. At a glance, it allows you to perform the following tasks.
- Keep tabs of system metrics and performance
- Create and manage users
- Browse and search system logs
- Inspect and interact with systemd-based services
- Access the terminal and run commands
- Inspect system’s hardware
- Create and manage virtual machines
- Upgrade software packages to their latest versions
- Configure Firewall & and many more.
Installation
Update Local Package Index
To start off, log into your server and refresh the local package index as follows.
sudo apt updateInstall Cockpit Web Console
The Cockpit web console packages are provided by the official Ubuntu repositories. You can verify this by running the following command.
apt search cockpitSo, install Cockpit using the APT package manager as shown.
sudo apt install cockpit -yThe command installs the Cockpit web console alongside other additional packages, libraries, and dependencies.
Verify Installation
Once installed, you can verify if cockpit is installed by running the following command:
apt -qq list cockpit OR $ dpkg -l cockpitOptional Packages
If you plan to manage KVM virtual machines with cockpit then install following package:
sudo apt install cockpit-machines -yBy default, Cockpit does not provide support for podman. If you wish to administer and manage podman containers using Cockpit, install the cockpit-podman package which provides support for podman.
sudo apt install cockpit-podman yStarting Cockpit Web Console Service
Unlike other services or daemons, Cockpit does not start automatically once installed. Therefore, start the Cockpit systemd service as shown.
sudo systemctl start cockpitVerify that the Cockpit service is running as follows.
sudo systemctl status cockpitCockpit listens on TCP port 9090. You can verify this is the case by running the following ss command.
ss -tunlpe | grep cockpitIf the firewall is enabled on your Ubuntu 22.04 system, then allow 9090/tcp port so it’s web console can be accessed from outside.
sudo ufw allow 9090/tcp
sudo ufw reload
Access Cockpit Web Console
To access Cockpit Web console, browse the following address, where server-ip is the IP address of your server running the cockpit instance.
You may get a warning that the website you are accessing is not private and that you could fall victim to hackers. Do not fret, as this happens since the server is encrypted by a self-signed SSL certificate which is not recognized by CA.
To get around this issue, simply click ‘Advanced’
Then click on ‘Proceed to [server-ip]’ link.
You should get the Cockpit login screen, similar to below.

Cockpit Issues
Known Issues & their Fixes

Issue:
Cannot install any Cockpit add-ons or perform any updates from the UI after installing Cockpit

If you're here because you're on Cockpit running on Ubuntu 22.04.1 LTS and you can't get the Cockpit Updates functionality to work, here's the answer to get it working.

By disabling the network-manager, we can resolve those errors (Yes, It’s more of workaround rather than fix)
Warning: Do not run these commands on production server, unless you know what you are doing.
Disable network-manager service and stop it immediately, then restart the system
sudo systemctl disable network-manager.service
sudo systemctl stop network-manager.service
sudo reboot
Now, get back to cockpit, errors won’t be there anymore
Webmin
 Webmin is a modern web control panel that allows you to administer your Linux server through a browser-based interface. With Webmin, you can manage user accounts, configure DNS settings, and change settings for common packages on the fly.
The Webmin Dashboard - Dark Mode

Installation
First, update your server’s package index if you’ve not done so recently:
sudo apt updateThen you need to add the Webmin repository so that you can install and update Webmin using your package manager. In order for your system to trust this new repository, first you’ll download Webmin’s PGP key and then convert it to a format that apt can use to verify files:
curl -fsSL https://download.webmin.com/jcameron-key.asc | sudo gpg --dearmor -o /usr/share/keyrings/webmin.gpgThis downloaded key is the same key that was used by the creator of Webmin to sign the package, and you will use this key to verify the package’s authenticity. In order to convert the .asc file to a workable .gpg file, the gpg --dearmor command is necessary.
Next you will add this repository to your /etc/apt/sources.list file, while referencing your newly converted file you just acquired in the previous step.
Open the file in your preferred editor. Here, you’ll use nano:
sudo nano /etc/apt/sources.listThen add this line to the bottom of the file to add the new repository:
deb [signed-by=/usr/share/keyrings/webmin.gpg] http://download.webmin.com/download/repository sarge contribSave the file and exit the editor. If you had used nano to edit, you can exit by pressing CTRL+X, Y, then ENTER.
Next, update the list of packages again in order to include the now-trusted Webmin repository:
sudo apt updateThen install Webmin:
sudo apt install webminOnce the installation finishes, you’ll be presented with the following output:
Output
. . .
Webmin install complete. You can now login to
https://your_server:10000 as root with your
root password, or as any user who can use sudo.
If you have installed and enabled the Ubuntu firewall (ufw), you will need to run the following command in order to allow Webmin through the firewall:
sudo ufw allow 10000Adding a Valid Certificate with Let’s Encrypt
Although I use a reverse proxy to manage my internal websites; with valid certificates for each site including Webmin, you can use a separate certificate with Webmin directly. The following tutorial from Digital Ocean outlines that process.
Webmin is already configured to use HTTPS, but it uses a self-signed, untrusted certificate. Let’s replace it with a valid certificate from Let’s Encrypt.
Note: When logging in for the first time, you will see an “Invalid SSL” warning. This warning may say something different depending on your browser, but the reason for it is that the server has generated a self-signed certificate. Allow the exception and proceed to your domain so you can replace the self-signed certificate with one from Let’s Encrypt.
You’ll be presented with a login screen. Sign in with the non-root user you created while fulfilling the prerequisites for this tutorial.
Once you log in, the first screen you will see is the Webmin dashboard. Before you can apply a valid certificate, you have to set the server’s hostname. Look for the System hostname field and click on the link to the right, as shown in the following figure:

This will take you to the Hostname and DNS Client page. Locate the Hostname field, and enter your Fully-Qualified Domain Name into the field. Then click the Save button at the bottom of the page to apply the setting.
After you’ve set your hostname, click on the Webmin dropdown menu in the left-hand navigation bar, and then click on Webmin Configuration.
From the Webmin Configuration page, select SSL Encryption from the list of icons, and then click on the Let’s Encrypt tab. You’ll see a screen like the following figure:

On this page, you’ll tell Webmin how to obtain and renew your certificate. Let’s Encrypt certificates expire after 3 months, but you can instruct Webmin to automatically attempt to renew the Let’s Encrypt certificate every month. Let’s Encrypt looks for a verification file on the server, so you’ll configure Webmin to place the verification file inside the folder /var/www/your_domain, which is the folder that the Apache web server you configured in the prerequisites uses. Follow these steps to set up your certificate:
- Fill in Hostnames for certificate with your FQDN.
- For Website root directory for validation file, select the Other Directory button and enter your website’s document root. Assuming you followed the prerequisite Apache tutorial this will be
/var/www/your_domain. - For Months between automatic renewal section, deselect the Only renew manually option by typing
1into the input box, and select the radio button to the left of the input box.
Click the Request Certificate button. After a few seconds, you will see a confirmation screen.
To use the new certificate, click the Return to Webmin configuration button on the confirmation screen. From that page, scroll down and click the Restart Webmin button. Wait around 30 seconds, and then reload the page and log in again. Your browser should now indicate that the certificate is valid.
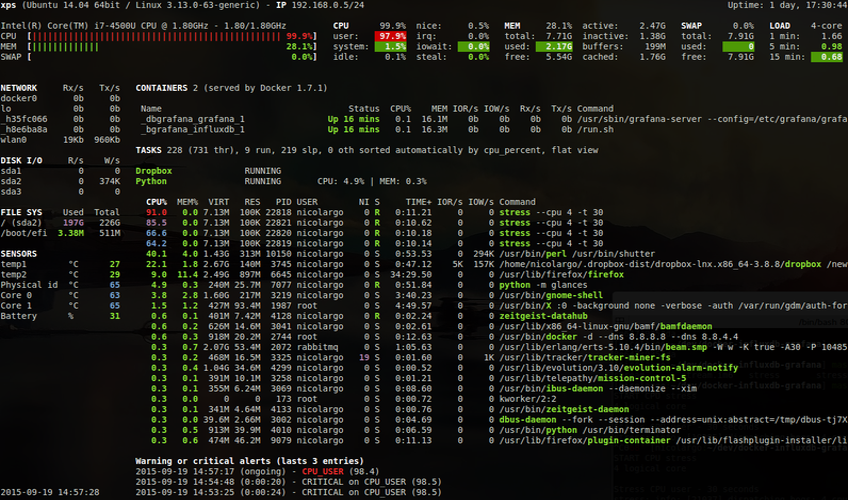
Glances

While not precisely a server management application, Glances does assist in monitoring your server which could help you manage it.
Glances is a feature rich, lightweight monitoring tool for a plethora of platforms including GNU/Linux, FreeBSD, OS X and Windows.
Glances can be accessed from a terminal or web interface and provides meaningful statistics and features such as:
|
CPU Load |
Memory |
| Network interface | Process list |
| Disk I/O | IRQ / Raid Sensors |
| Docker | Filesystem |
| Monitor Alarms & Uptime |
System info |
You can export all system statistics to CSV, InfluxDB, Cassandra, OpenTSDB, StatsD, ElasticSearch or even RabbitMQ. Glances also provides a dedicated Grafana dashboard.
Installation
There are several installation methods for Glances. While I exclusively use the container methods of installation; you can find all the installation....IN PROGRESS